什么是MVC,什么是Spring MVC
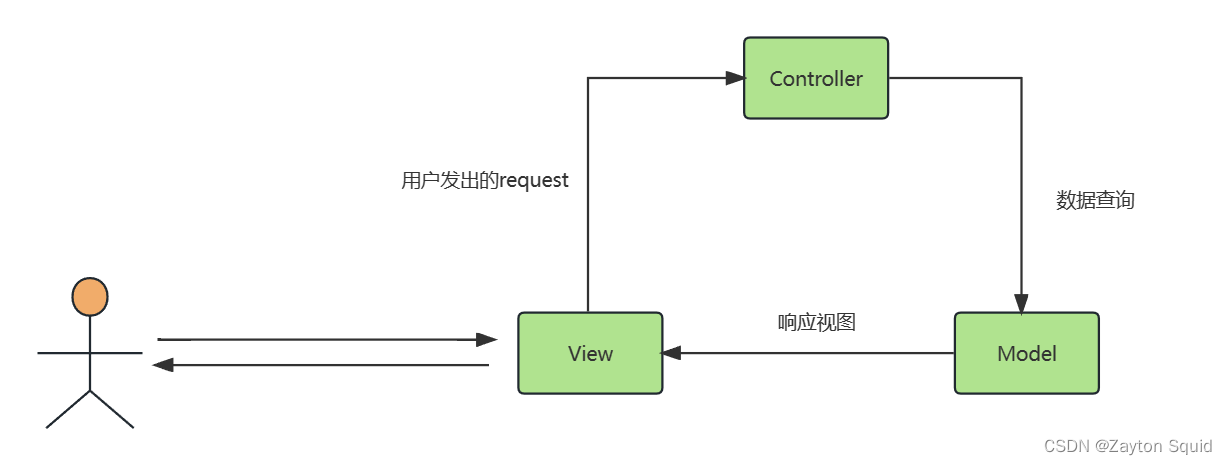
MVC(Model View Controller)是一种软件设计规范,是一种将业务逻辑、数据、显示分离的一种解耦思想。由模型(Model)处理应用程序的数据部分,视图(View)处理数据显示部分,它们两者之间交友控制器(Controller)调度,控制器通常从视图读取数据,控制用户输入,并向模型发送数据。而Spring MVC是由Spring提供的遵循MVC的规范的轻量级web框架,目的是为了简化Java栈的web开发。
Spring MVC 的核心组件
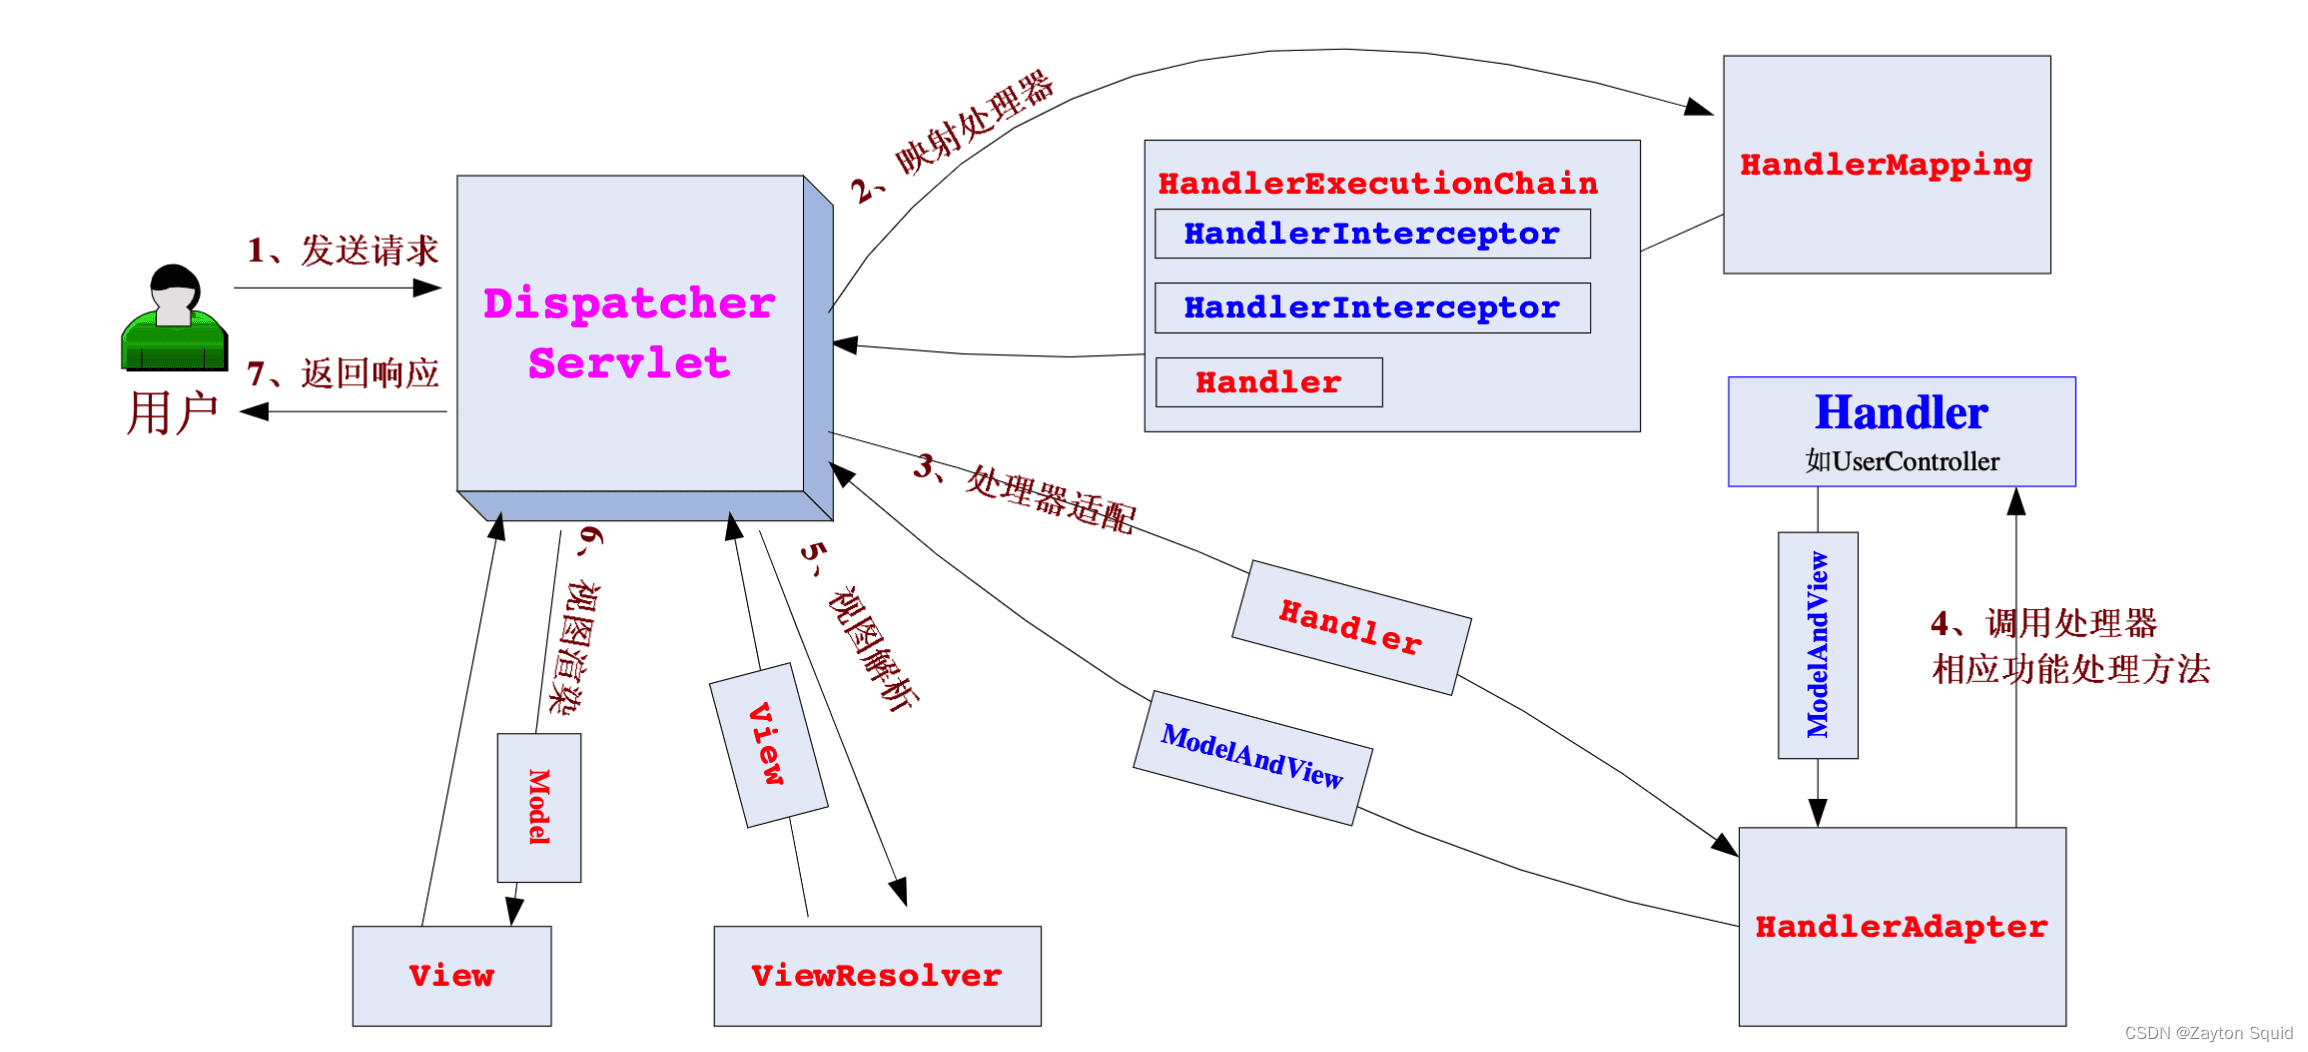
DispatcherServlet:前端控制器,负责接收分发用户请求,并给予客户端响应。HandlerMapping:处理器映射器,根据URL去找到合适的Handler。HandlerAdapter:处理器适配器,根据HandlerMapping找到的Handler,适配执行对应的Handler。Handler:处理器,处理用户的请求。ViewResovler:视图解析器,根据Handler返回的结果,解析并渲染成对应的页面,然后传递给DispatcherServlet返回给前端。
SpringMVC工作原理是什么
- 用户向服务器发送请求,请求被
DispatcherServlet拦截。 DispatcherServlet根据信息找到对应的HandlerMapping。- 通过
HandlerMapping找到具体的处理器(Controller或Handler)和拦截器,生成处理器对象及处理器拦截器并返回给DispatcherServlet。 - 然后
DispatcherServlet调用HanlderAdapter处理器适配器执行对应的Handler。 Handler完成对用户请求的处理后,会返回一个ModelAndView给DispatcherServlet。DispatcherServlet将ModelAndView传给ViewReslover视图解析器。ViewReslover解析后返回具体的view给DispatcherServlet。DispatcherServlet根据view进行渲染视图(即将Model数据填充至视图),然后响应给用户。
源码分析
搭建Spring MVC的示例代码
maven依赖
 <dependency>
    <groupId>org.springframework</groupId>
     <artifactId>spring-webmvc</artifactId>
     <version>>5.3.10</version>
 </dependency>

 <dependency>
     <groupId>javax.servlet</groupId>
     <artifactId>javax.servlet-api</artifactId>
     <version>4.0.1</version>
 </dependency>

 <dependency>
     <groupId>javax.servlet</groupId>
     <artifactId>jstl</artifactId>
     <version>1.2</version>
 </dependency>

 <dependency>
     <groupId>taglibs</groupId>
     <artifactId>standard</artifactId>
     <version>1.1.2</version>
 </dependency>
Controller层
@Controller
public class HelloController {
    private static final Logger logger = LoggerFactory.getLogger(HelloController.class);

    @RequestMapping("/hello")
    public ModelAndView hello(HttpServletRequest request, HttpServletResponse response) {
        logger.info("hello方法 被调用");
        ModelAndView modelAndView = new ModelAndView();
        modelAndView.addObject("message", "Hello World!");
        modelAndView.setViewName("index");
        return modelAndView;
    }
}
配置springmvc.xml
<?xml version="1.0" encoding="UTF-8"?>
<beans xmlns="http://www.springframework.org/schema/beans"
       xmlns:xsi="http://www.w3.org/2001/XMLSchema-instance"
       xmlns:context="http://www.springframework.org/schema/context"
       xmlns:mvc="http://www.springframework.org/schema/mvc"

       xsi:schemaLocation="http://www.springframework.org/schema/beans http://www.springframework.org/schema/beans/spring-beans.xsd
       http://www.springframework.org/schema/context http://www.springframework.org/schema/context/spring-context.xsd
       http://www.springframework.org/schema/mvc http://www.springframework.org/schema/mvc/spring-mvc.xsd">

    <!-- 扫描注解 -->
    <context:component-scan base-package="org.springmvc"/>

    <!-- 静态资源处理 -->
    <mvc:default-servlet-handler/>

    <!-- 开启注解 -->
    <mvc:annotation-driven/>

    <!-- 视图解析器 -->
    <bean id="jspViewResolver" class="org.springframework.web.servlet.view.InternalResourceViewResolver">
        <property name="viewClass" value="org.springframework.web.servlet.view.JstlView"/>
        <property name="prefix" value="/WEB-INF/views/"/>
        <property name="suffix" value=".jsp"/>
    </bean>

</beans>
配置web.xml
<?xml version="1.0" encoding="UTF-8"?>
<web-app xmlns="http://xmlns.jcp.org/xml/ns/javaee"
         xmlns:xsi="http://www.w3.org/2001/XMLSchema-instance"
         xsi:schemaLocation="http://xmlns.jcp.org/xml/ns/javaee http://xmlns.jcp.org/xml/ns/javaee/web-app_3_1.xsd"
         version="3.1">

    <!-- 定义Spring MVC的前端控制器 -->
    <servlet>
        <servlet-name>springmvc</servlet-name>
        <servlet-class>org.springframework.web.servlet.DispatcherServlet</servlet-class>
        <!-- 通过初始化参数指定SpringMVC配置文件的位置和名称 -->
        <init-param>
            <param-name>contextConfigLocation</param-name>
            <param-value>classpath:springmvc.xml</param-value>
        </init-param>
        <load-on-startup>1</load-on-startup>
    </servlet>

    <servlet-mapping>
        <servlet-name>springmvc</servlet-name>
        <url-pattern>/</url-pattern>
    </servlet-mapping>

</web-app>
编写jsp
<%@ page language="java" contentType="text/html; charset=UTF-8"
         pageEncoding="UTF-8"%>
<!DOCTYPE html PUBLIC "-//W3C//DTD HTML 4.01 Transitional//EN" "http://www.w3.org/TR/html4/loose.dtd">
<html>
<head>
    <meta http-equiv="Content-Type" content="text/html; charset=UTF-8">
    <title>welcome</title>
</head>
<body>
${requestScope.message}
</body>
</html>
DispatcherServlet初始化过程
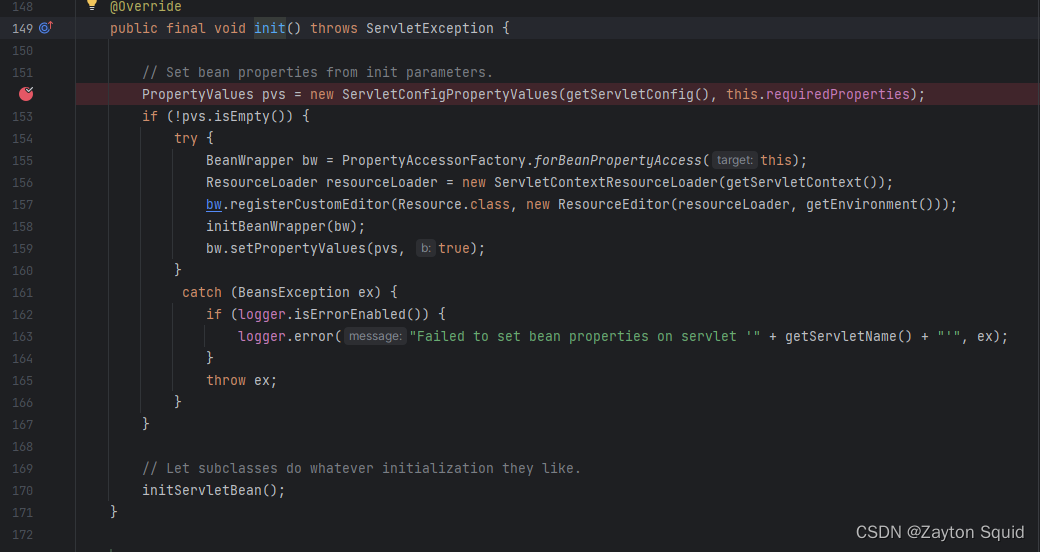
启动tomcat后,找到init()的方法位于HttpServletBean中,打上断点,开始进行分析
 在
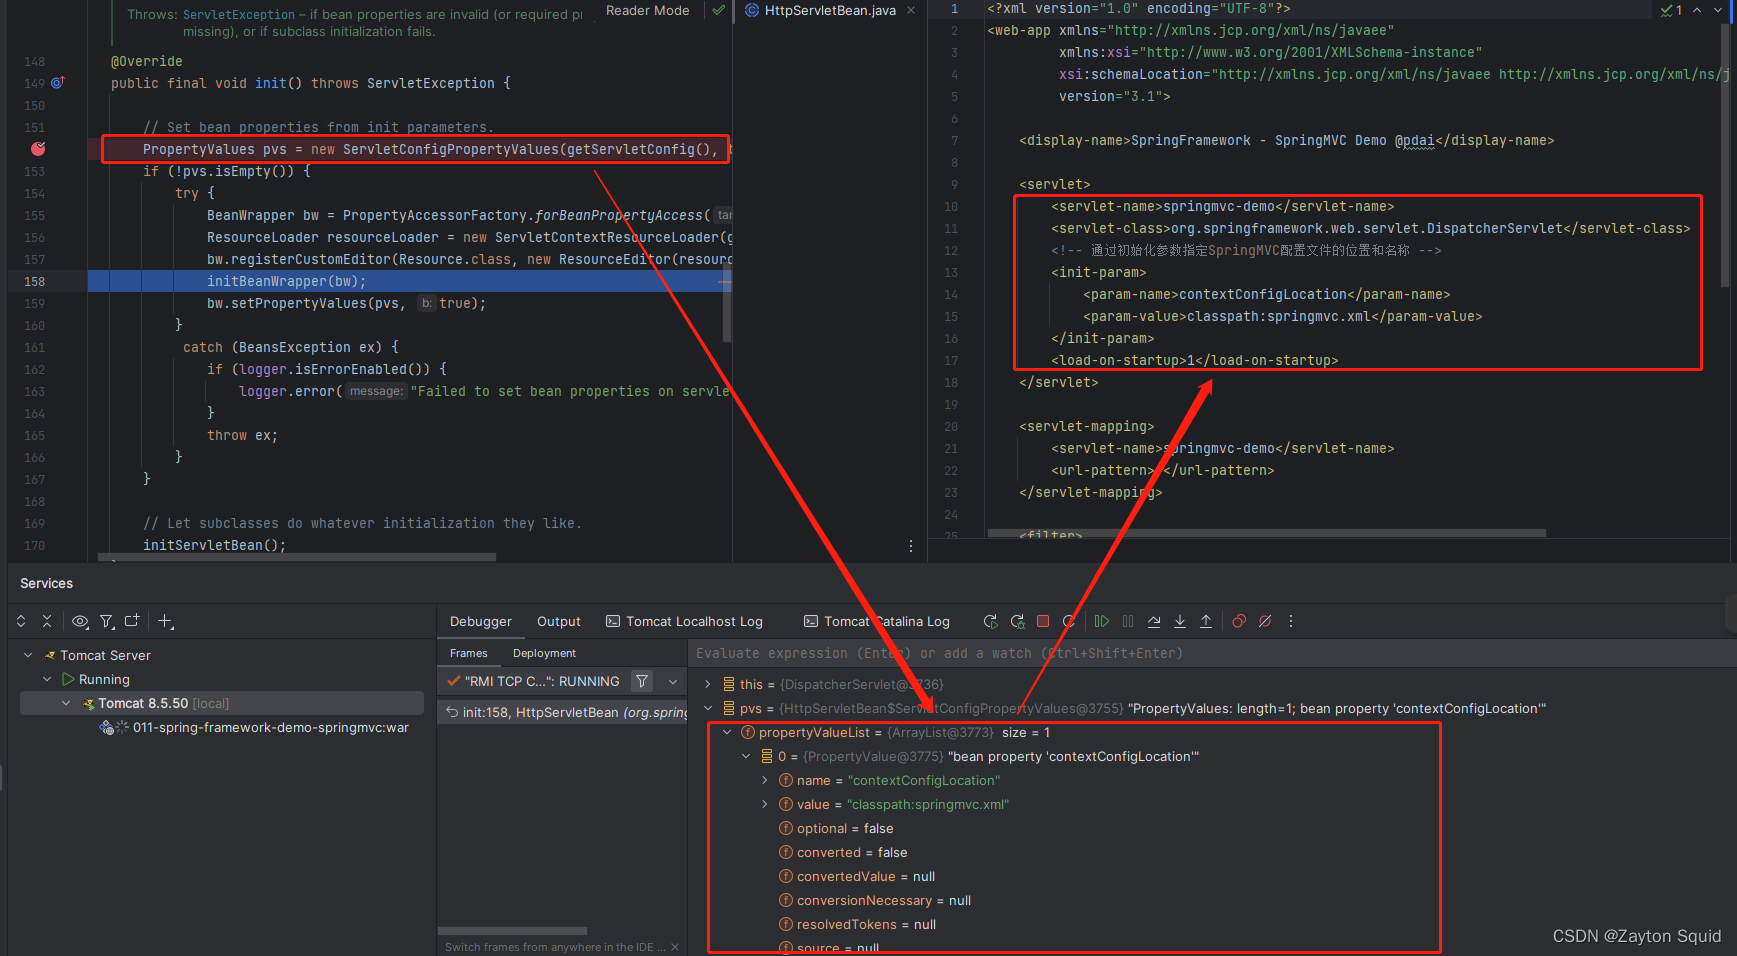
在HttpServletBean#init中,init()主要读取web.xml中servlet参数配置,并将交给子类方法initServletBean()继续初始化
@Override
public final void init() throws ServletException {

  // 获得web.xml中的contextConfigLocation配置属性,就是spring MVC的配置文件
  PropertyValues pvs = new ServletConfigPropertyValues(getServletConfig(), this.requiredProperties);
  if (!pvs.isEmpty()) {
    try {
      // 转换成BeanWrapper,为了方便使用Spring的属性注入功能
      BeanWrapper bw = PropertyAccessorFactory.forBeanPropertyAccess(this);
      // 获取服务器的各种信息
      ResourceLoader resourceLoader = new ServletContextResourceLoader(getServletContext());
      bw.registerCustomEditor(Resource.class, new ResourceEditor(resourceLoader, getEnvironment()));
      // 更多的初始化可以让子类去拓展
      initBeanWrapper(bw);
      // 让spring注入namespace,contextConfigLocation等属性
      bw.setPropertyValues(pvs, true);
    }
    catch (BeansException ex) {
      if (logger.isErrorEnabled()) {
        logger.error("Failed to set bean properties on servlet '" + getServletName() + "'", ex);
      }
      throw ex;
    }
  }

  // 让子类去拓展
  initServletBean();
}
从下图中可以看到web.xml中的servlet参数配置被读取。
 再看下
再看下FrameworkServlet#initServletBean()方法。
@Override
protected final void initServletBean() throws ServletException {
  getServletContext().log("Initializing Spring " + getClass().getSimpleName() + " '" + getServletName() + "'");
  if (logger.isInfoEnabled()) {
    logger.info("Initializing Servlet '" + getServletName() + "'");
  }
  long startTime = System.currentTimeMillis();

  try {
    // 最重要的是这个方法
    this.webApplicationContext = initWebApplicationContext();

    // 可以让子类进一步拓展
    initFrameworkServlet();
  }
  catch (ServletException | RuntimeException ex) {
    logger.error("Context initialization failed", ex);
    throw ex;
  }

  //忽略....
}
initWebApplicationContext用来初始化和刷新WebApplicationContext
protected WebApplicationContext initWebApplicationContext() {
  WebApplicationContext rootContext =
      WebApplicationContextUtils.getWebApplicationContext(getServletContext());
  WebApplicationContext wac = null;

  // 如果在构造函数已经被初始化
  if (this.webApplicationContext != null) {
    // A context instance was injected at construction time -> use it
    wac = this.webApplicationContext;
    if (wac instanceof ConfigurableWebApplicationContext) {
      ConfigurableWebApplicationContext cwac = (ConfigurableWebApplicationContext) wac;
      if (!cwac.isActive()) {
        // The context has not yet been refreshed -> provide services such as
        // setting the parent context, setting the application context id, etc
        if (cwac.getParent() == null) {
          // The context instance was injected without an explicit parent -> set
          // the root application context (if any; may be null) as the parent
          cwac.setParent(rootContext);
        }
        configureAndRefreshWebApplicationContext(cwac);
      }
    }
  }
  // 没有在构造函数中初始化,则尝试通过contextAttribute初始化
  if (wac == null) {
    // No context instance was injected at construction time -> see if one
    // has been registered in the servlet context. If one exists, it is assumed
    // that the parent context (if any) has already been set and that the
    // user has performed any initialization such as setting the context id
    wac = findWebApplicationContext();
  }

  // 还没有的话,只能重新创建了
  if (wac == null) {
    // No context instance is defined for this servlet -> create a local one
    wac = createWebApplicationContext(rootContext);
  }

  if (!this.refreshEventReceived) {
    // Either the context is not a ConfigurableApplicationContext with refresh
    // support or the context injected at construction time had already been
    // refreshed -> trigger initial onRefresh manually here.
    synchronized (this.onRefreshMonitor) {
      onRefresh(wac);
    }
  }

  if (this.publishContext) {
    // Publish the context as a servlet context attribute.
    String attrName = getServletContextAttributeName();
    getServletContext().setAttribute(attrName, wac);
  }

  return wac;
}
webApplicationContext只会初始化一次,依次尝试构造函数初始化,没有则通过findWebApplicationContext()方法初始化,仍没有则使用createWebApplicationContext()创建新的,下面我们看看createWebApplicationContext的源码。
protected WebApplicationContext createWebApplicationContext(@Nullable ApplicationContext parent) {
		Class<?> contextClass = getContextClass();
		//忽略...

		// 通过反射方式初始化
		ConfigurableWebApplicationContext wac =
				(ConfigurableWebApplicationContext) BeanUtils.instantiateClass(contextClass);

		wac.setEnvironment(getEnvironment());
		wac.setParent(parent);
		//获取springmvc.xml
		String configLocation = getContextConfigLocation();
		if (configLocation != null) {
			wac.setConfigLocation(configLocation);
		}
		//初始化上下文,设置id,environment,configLocation
		configureAndRefreshWebApplicationContext(wac);

		return wac;
	}
configureAndRefreshWebApplicationContext方法初始化上下文
protected void configureAndRefreshWebApplicationContext(ConfigurableWebApplicationContext wac) {
  // 设置context ID
  if (ObjectUtils.identityToString(wac).equals(wac.getId())) {
    // The application context id is still set to its original default value
    // -> assign a more useful id based on available information
    if (this.contextId != null) {
      wac.setId(this.contextId);
    }
    else {
      // Generate default id...
      wac.setId(ConfigurableWebApplicationContext.APPLICATION_CONTEXT_ID_PREFIX +
          ObjectUtils.getDisplayString(getServletContext().getContextPath()) + '/' + getServletName());
    }
  }

  // 设置servletContext, servletConfig, namespace, listener...
  wac.setServletContext(getServletContext());
  wac.setServletConfig(getServletConfig());
  wac.setNamespace(getNamespace());
  wac.addApplicationListener(new SourceFilteringListener(wac, new ContextRefreshListener()));

  // The wac environment's #initPropertySources will be called in any case when the context
  // is refreshed; do it eagerly here to ensure servlet property sources are in place for
  // use in any post-processing or initialization that occurs below prior to #refresh
  ConfigurableEnvironment env = wac.getEnvironment();
  if (env instanceof ConfigurableWebEnvironment) {
    ((ConfigurableWebEnvironment) env).initPropertySources(getServletContext(), getServletConfig());
  }

  // 让子类去拓展
  postProcessWebApplicationContext(wac);
  applyInitializers(wac);

  // Spring环境初始化完了,就可以初始化DispatcherServlet处理流程中需要的组件了。
  wac.refresh();
}
webApplicationContext创建完成后,我们返回到FrameworkServlet#initWebApplicationContext,执行onRefresh()方法,调用initStrategies(context)方法对DispatcherServlet中的组件进行初始化,这些组件就是在SpringMVC请求流程中包的主要组件。
protected void onRefresh(ApplicationContext context) {
		initStrategies(context);
}


protected void initStrategies(ApplicationContext context) {
	initMultipartResolver(context);
	initLocaleResolver(context);
	initThemeResolver(context);
	//initHandlerxx 重点
	initHandlerMappings(context);
	initHandlerAdapters(context);
	initHandlerExceptionResolvers(context);

	initRequestToViewNameTranslator(context);
	initViewResolvers(context);
	initFlashMapManager(context);
}
在initHandlerMappings中,它默认会加载所有HandlerMapping然后根据优先级进行排序,优先使用优先级高的HandlerMapping;若想加载指定HandlerMapping则在web.xml中将detectAllHandlerMappings设置为false,Spring MVC就只会查找名为handlerMapping的bean,并作为当前系统的唯一的HandlerMapping
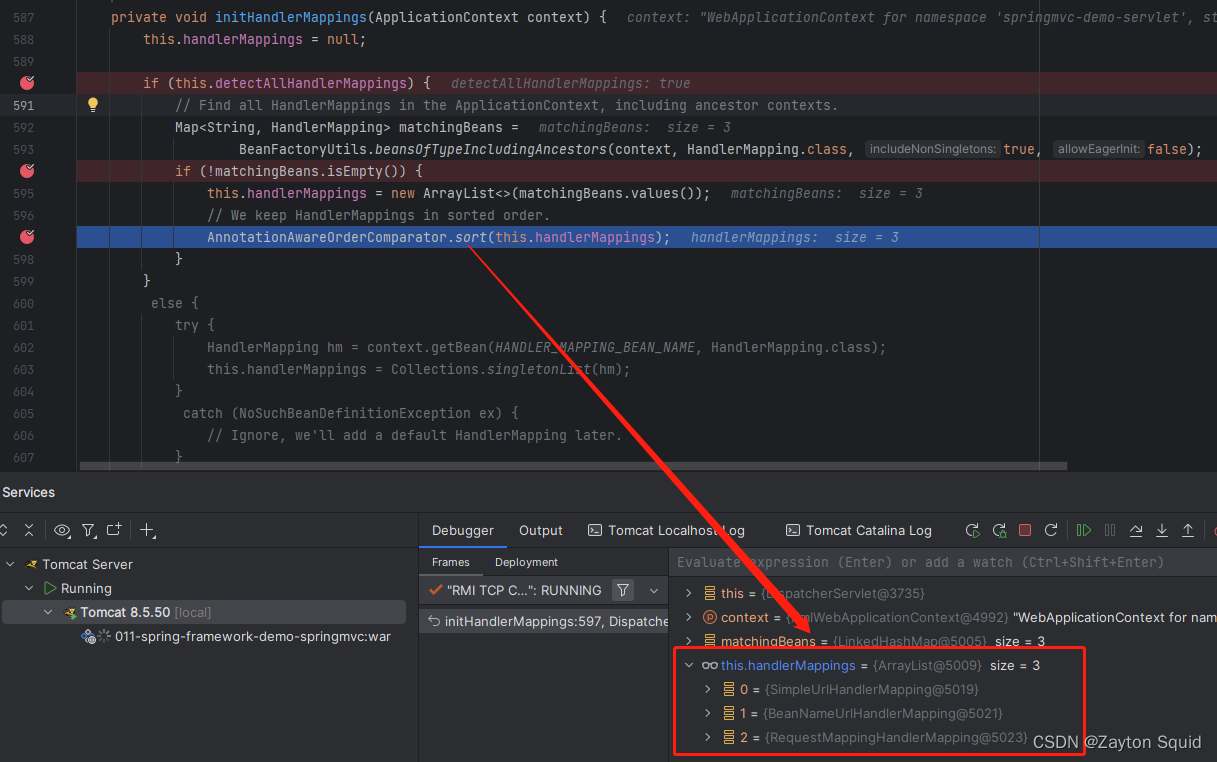
initHandlerAdapters方法和initHandlerExceptionResolvers方法与initHandlerMappings是相似的。
DispatcherServlet处理请求的过程
客户端发送请求给服务器端,服务器端会将请求发送给Servlet,然后Servlet初始化就是上文所述的阶段,Servlet在执行期间会调用HttpServlet的service()的方法,该方法会判断客户端的请求方式,不同请求方式调用不同的方法,假设我们的请求是get,那么它就会调用doGet。我们在DispatcherServlet的父类FrameworkServlet 找到重写HttpServlet的service()方法,所以我们从FrameworkServlet#service开始分析。
@Override
protected void service(HttpServletRequest request, HttpServletResponse response)
			throws ServletException, IOException {

		HttpMethod httpMethod = HttpMethod.resolve(request.getMethod());
		//请求方法是patch或者为null,则
		if (httpMethod == HttpMethod.PATCH || httpMethod == null) {
			processRequest(request, response);
		}
		else {
			super.service(request, response);
		}
}

protected void service(HttpServletRequest req, HttpServletResponse resp)
       throws ServletException, IOException {

       String method = req.getMethod();
	//如果请求方式是Get
       if (method.equals(METHOD_GET)) {
           long lastModified = getLastModified(req);
           if (lastModified == -1) {
               // servlet doesn't support if-modified-since, no reason
               // to go through further expensive logic
               doGet(req, resp);
           } else {
               //忽略....
           }

       }
       //忽略....
}
判断请求方式是Get后,会进入到doGet方法,然后执行processRequest处理请求
@Override
protected final void doGet(HttpServletRequest request, HttpServletResponse response)
		throws ServletException, IOException {

	processRequest(request, response);
}

protected final void processRequest(HttpServletRequest request, HttpServletResponse response)
   throws ServletException, IOException {

   //忽略....

  // 初始化context
  initContextHolders(request, localeContext, requestAttributes);

  try {
    // 看这里
    doService(request, response);
  }
  catch (ServletException | IOException ex) {
    failureCause = ex;
    throw ex;
  }
  catch (Throwable ex) {
    failureCause = ex;
    throw new NestedServletException("Request processing failed", ex);
  }

  finally {
    //忽略....
  }
}
然后执行DispatcherServlet#doService方法
@Override
protected void doService(HttpServletRequest request, HttpServletResponse response) throws Exception {
  logRequest(request);

  // 保存下请求之前的参数.
  Map<String, Object> attributesSnapshot = null;
  if (WebUtils.isIncludeRequest(request)) {
    //忽略....
  }

  // 方便后续 handlers 和 view 要使用它们.
  request.setAttribute(WEB_APPLICATION_CONTEXT_ATTRIBUTE, getWebApplicationContext());
  request.setAttribute(LOCALE_RESOLVER_ATTRIBUTE, this.localeResolver);
  request.setAttribute(THEME_RESOLVER_ATTRIBUTE, this.themeResolver);
  request.setAttribute(THEME_SOURCE_ATTRIBUTE, getThemeSource());

  if (this.flashMapManager != null) {
   //忽略....
  }

  RequestPath previousRequestPath = null;
  if (this.parseRequestPath) {
    previousRequestPath = (RequestPath) request.getAttribute(ServletRequestPathUtils.PATH_ATTRIBUTE);
    ServletRequestPathUtils.parseAndCache(request);
  }

  try {
    // 看这里,终于将这个请求分发出去了
    doDispatch(request, response);
  }
  finally {
    //忽略...
  }
}
DispatcherServlet的doDispatch就会找到合适的HandlerMapping交由适配器找到合适的handler进行包装然后着手处理
protected void doDispatch(HttpServletRequest request, HttpServletResponse response) throws Exception {
  HttpServletRequest processedRequest = request;
  HandlerExecutionChain mappedHandler = null;
  boolean multipartRequestParsed = false;

  WebAsyncManager asyncManager = WebAsyncUtils.getAsyncManager(request);

  try {
    ModelAndView mv = null;
    Exception dispatchException = null;

    try {
      // 判断是不是文件上传类型的request
      processedRequest = checkMultipart(request);
      multipartRequestParsed = (processedRequest != request);

      // 根据handlerMapping找到合适的handler.
      mappedHandler = getHandler(processedRequest);
      if (mappedHandler == null) {
        noHandlerFound(processedRequest, response);
        return;
      }

      // 根据handler获取匹配的handlerAdapter
      HandlerAdapter ha = getHandlerAdapter(mappedHandler.getHandler());

      //忽略....

      // handle执行并返回一个modelAndView
      mv = ha.handle(processedRequest, response, mappedHandler.getHandler());

      if (asyncManager.isConcurrentHandlingStarted()) {
        return;
      }

      // 通过视图的prefix和postfix获取完整的视图名
      applyDefaultViewName(processedRequest, mv);

      // 应用后置的拦截器
      mappedHandler.applyPostHandle(processedRequest, response, mv);
    }
     //忽略...

    // 处理handler处理的结果,该结果要么是ModelAndView,要么是要解析为ModelAndView的异常。
    processDispatchResult(processedRequest, response, mappedHandler, mv, dispatchException);
  }

  //忽略...
}
在AbstractHandlerMethodAdapter#handle中会交给handleInternal方法处理
	@Override
	protected ModelAndView handleInternal(HttpServletRequest request,
			HttpServletResponse response, HandlerMethod handlerMethod) throws Exception {

		ModelAndView mav;
		checkRequest(request);

		if (this.synchronizeOnSession) {
			//获取session
			HttpSession session = request.getSession(false);
			if (session != null) {
				Object mutex = WebUtils.getSessionMutex(session);
				//上锁,执行处理逻辑,得到modelAndView
				synchronized (mutex) {
					mav = invokeHandlerMethod(request, response, handlerMethod);
				}
			}
			else {
				mav = invokeHandlerMethod(request, response, handlerMethod);
			}
		}
		else {
			mav = invokeHandlerMethod(request, response, handlerMethod);
		}

		if (!response.containsHeader(HEADER_CACHE_CONTROL)) {
			if (getSessionAttributesHandler(handlerMethod).hasSessionAttributes()) {
				applyCacheSeconds(response, this.cacheSecondsForSessionAttributeHandlers);
			}
			else {
				prepareResponse(response);
			}
		}

		return mav;
	}
执行invokeHandlerMethod对RequestMapping处理程序方法
@Nullable
	protected ModelAndView invokeHandlerMethod(HttpServletRequest request,
			HttpServletResponse response, HandlerMethod handlerMethod) throws Exception {

		ServletWebRequest webRequest = new ServletWebRequest(request, response);
		try {

			WebDataBinderFactory binderFactory = getDataBinderFactory(handlerMethod);

			// 获取ModelFactory,ModelFactory可以协助控制器在调用方法之前初始化模型,并在调用之后更新模型
			ModelFactory modelFactory = getModelFactory(handlerMethod, binderFactory);
			//设置handler方法上的参数
			ServletInvocableHandlerMethod invocableMethod = createInvocableHandlerMethod(handlerMethod);
			// 尝试绑定参数、返回值解析器
			if (this.argumentResolvers != null) {
				invocableMethod.setHandlerMethodArgumentResolvers(this.argumentResolvers);
			}
			if (this.returnValueHandlers != null) {
				invocableMethod.setHandlerMethodReturnValueHandlers(this.returnValueHandlers);
			}
			invocableMethod.setDataBinderFactory(binderFactory);
			invocableMethod.setParameterNameDiscoverer(this.parameterNameDiscoverer);

			// 创建ModelAndViewContainer,并初始化Model对象
			ModelAndViewContainer mavContainer = new ModelAndViewContainer();
			mavContainer.addAllAttributes(RequestContextUtils.getInputFlashMap(request));
			modelFactory.initModel(webRequest, mavContainer, invocableMethod);
			mavContainer.setIgnoreDefaultModelOnRedirect(this.ignoreDefaultModelOnRedirect);

			// 异步请求相关
			AsyncWebRequest asyncWebRequest = WebAsyncUtils.createAsyncWebRequest(request, response);
			asyncWebRequest.setTimeout(this.asyncRequestTimeout);

			WebAsyncManager asyncManager = WebAsyncUtils.getAsyncManager(request);
			asyncManager.setTaskExecutor(this.taskExecutor);
			asyncManager.setAsyncWebRequest(asyncWebRequest);
			asyncManager.registerCallableInterceptors(this.callableInterceptors);
			asyncManager.registerDeferredResultInterceptors(this.deferredResultInterceptors);

			if (asyncManager.hasConcurrentResult()) {
				Object result = asyncManager.getConcurrentResult();
				mavContainer = (ModelAndViewContainer) asyncManager.getConcurrentResultContext()[0];
				asyncManager.clearConcurrentResult();
				if (logger.isDebugEnabled()) {
					logger.debug("Found concurrent result value [" + result + "]");
				}
				invocableMethod = invocableMethod.wrapConcurrentResult(result);
			}

			// 执行Controller中的具体方法并处理返回值
			invocableMethod.invokeAndHandle(webRequest, mavContainer);
			if (asyncManager.isConcurrentHandlingStarted()) {
				return null;
			}

			// 返回ModelAndView对象
			return getModelAndView(mavContainer, modelFactory, webRequest);
		}
		finally {
			webRequest.requestCompleted();
		}
	}
而后直接来到InvocableHandlerMethod#doInvoke
	//使用给定的参数值调用处理程序方法。
	protected Object doInvoke(Object... args) throws Exception {
		Method method = getBridgedMethod();
		try {
			if (KotlinDetector.isSuspendingFunction(method)) {
				return CoroutinesUtils.invokeSuspendingFunction(method, getBean(), args);
			}
			//执行Control类中的方法
			return method.invoke(getBean(), args);
		}

	//忽略....
}
然后回到processDispatchResult方法对视图和模型进行处理,最后将结果返回给DispatcherServlet,由DispatcherServlet响应给用户。
过滤器和拦截器的区别
我们不妨基于一段示例代码来了解一下二者的区别,首先我们在项目中配置过滤器,直接实现Filter接口即可,也可以通过注解@WebFilter来实现。
@Component
public class MyFilter implements Filter {

    @Override
    public void init(FilterConfig filterConfig) throws ServletException {

        System.out.println("Filter 前置");
    }

    @Override
    public void doFilter(ServletRequest servletRequest, ServletResponse servletResponse, FilterChain filterChain) throws IOException, ServletException {

        System.out.println("Filter 处理中");
        filterChain.doFilter(servletRequest, servletResponse);
    }

    @Override
    public void destroy() {

        System.out.println("Filter 后置");
    }
}
拦截器则通过实现HandlerInterceptor接口
@Component
public class MyInterceptor implements HandlerInterceptor {

    @Override
    public boolean preHandle(HttpServletRequest request, HttpServletResponse response, Object handler) throws Exception {
        System.out.println("Interceptor 前置");
        return true;
    }

    @Override
    public void postHandle(HttpServletRequest request, HttpServletResponse response, Object handler, ModelAndView modelAndView) throws Exception {
        System.out.println("Interceptor 处理中");
    }

    @Override
    public void afterCompletion(HttpServletRequest request, HttpServletResponse response, Object handler, Exception ex) throws Exception {
        System.out.println("Interceptor 后置");
    }
}
拦截器编写好后,还需要配置一些属性设置才使得拦截器能拦截所有URL。
@Configuration
public class MyMvcConfig implements WebMvcConfigurer {

    @Override
    public void addInterceptors(InterceptorRegistry registry) {
        registry.addInterceptor(new MyInterceptor()).addPathPatterns("/**");

    }
}
配置完拦截器后,我们访问下面这条命令,就会看到上面拦截器和过滤器输出的信息。
curl http://localhost:8080/hello
实现原理不同
过滤器的工作原理是基于函数回调的,将一个个过滤器组成一个过滤器链,以责任链模式的方式在请求到达web容器时,按顺序一个一个执行filter,例如我们上面请求hello方法时,请求就会依次调用Spring MVC中的ApplicationFilterChain走到MyFilter。
我们直接deBug的方式更直观的了解,如下图所示,根据堆栈信息我们可以看到最初访问的是ApplicationFilterChain的doFilter方法
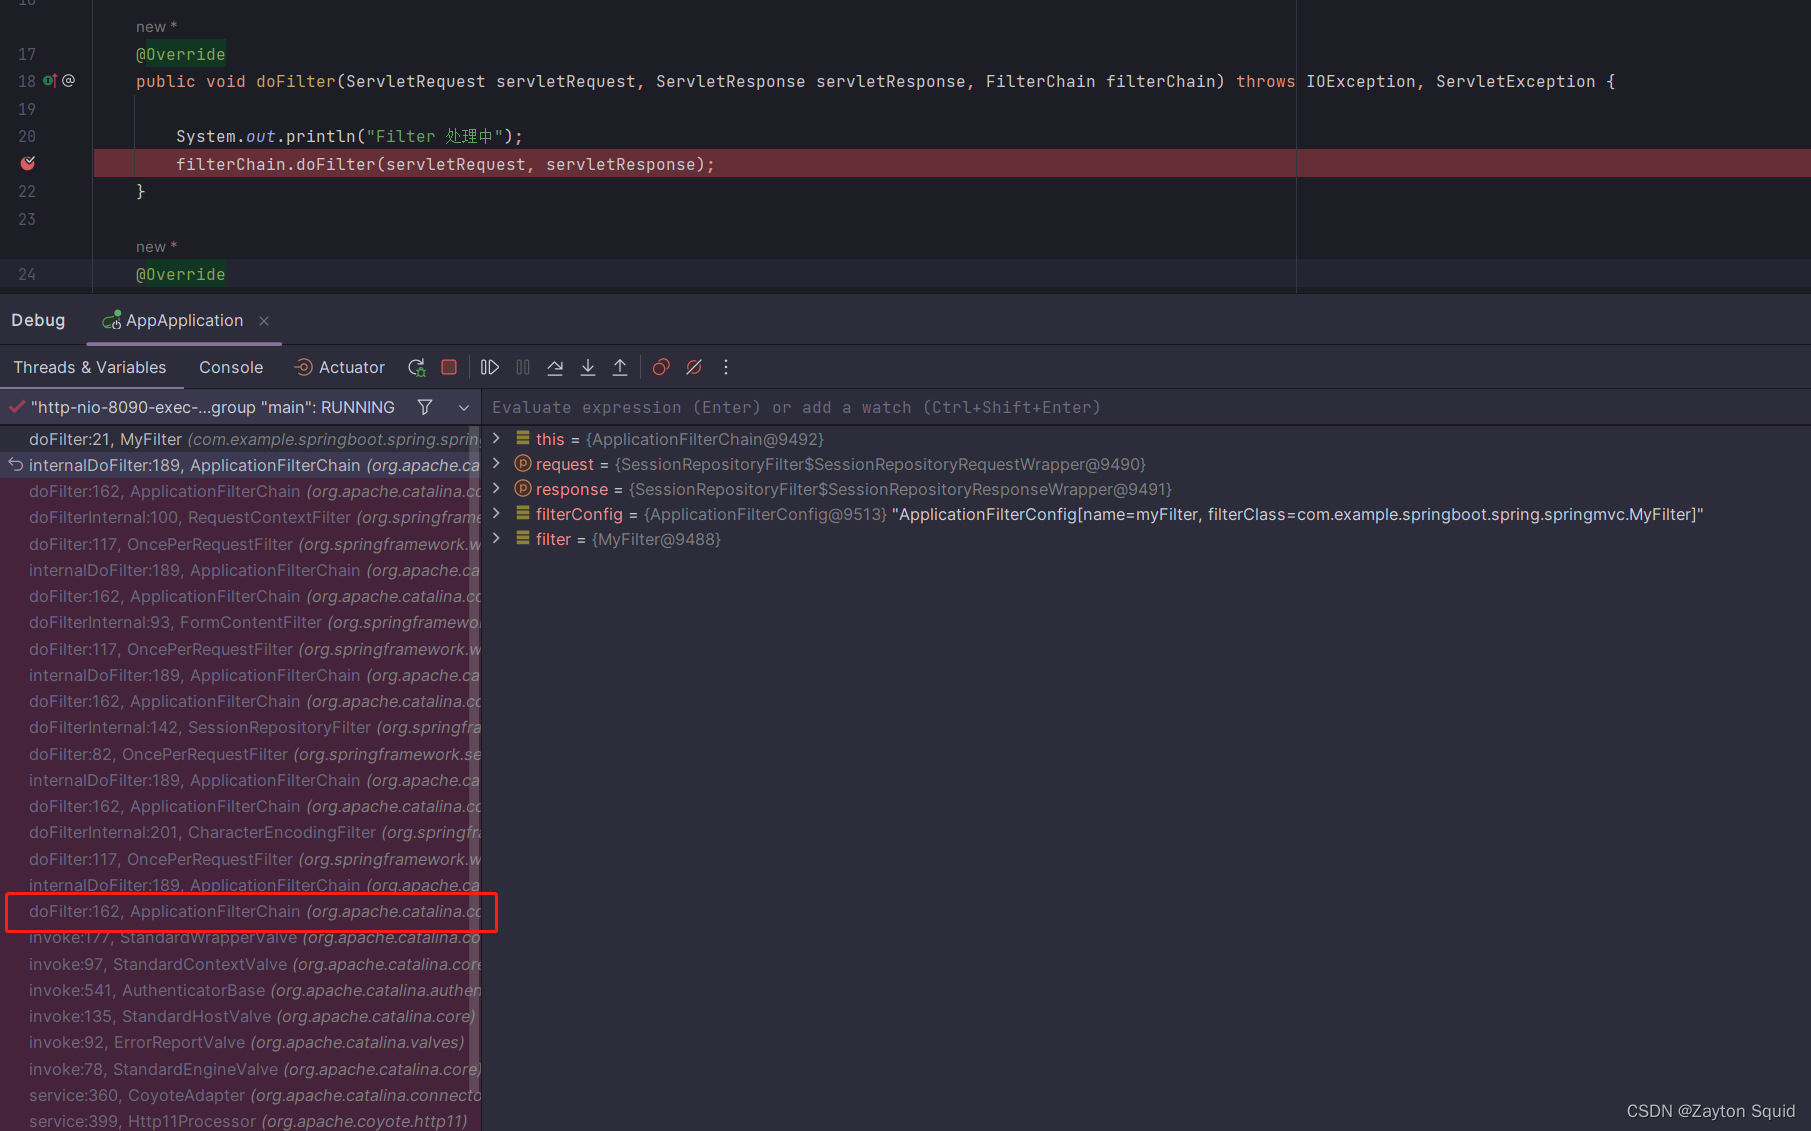 点进
点进doFilter方法可以看到它会执行internalDoFilter方法,获取第pos个filter,然后执行 filter.doFilter(request, response, this);。
 public void doFilter(ServletRequest request, ServletResponse response)
        throws IOException, ServletException {

        if( Globals.IS_SECURITY_ENABLED ) {
         //忽略...
        } else {
            internalDoFilter(request,response);
        }
    }

private void internalDoFilter(ServletRequest request,
                                  ServletResponse response)
        throws IOException, ServletException {

        if (pos < n) {
           //获取第pos个filter
            ApplicationFilterConfig filterConfig = filters[pos++];
            try {
                Filter filter = filterConfig.getFilter();

                if (request.isAsyncSupported() && "false".equalsIgnoreCase(
                        filterConfig.getFilterDef().getAsyncSupported())) {
					//忽略.......
                } else {
                //执行下一个过滤器的filter逻辑
                    filter.doFilter(request, response, this);
                }
            }
            //忽略.......
            return;
        }
            //忽略.......
而拦截器则是基于Java的反射机制(动态代理)实现的。
使用范围不同
从源码中我们可以看到过滤器是依赖于Tomcat等容器,导致它只能作用于web程序。
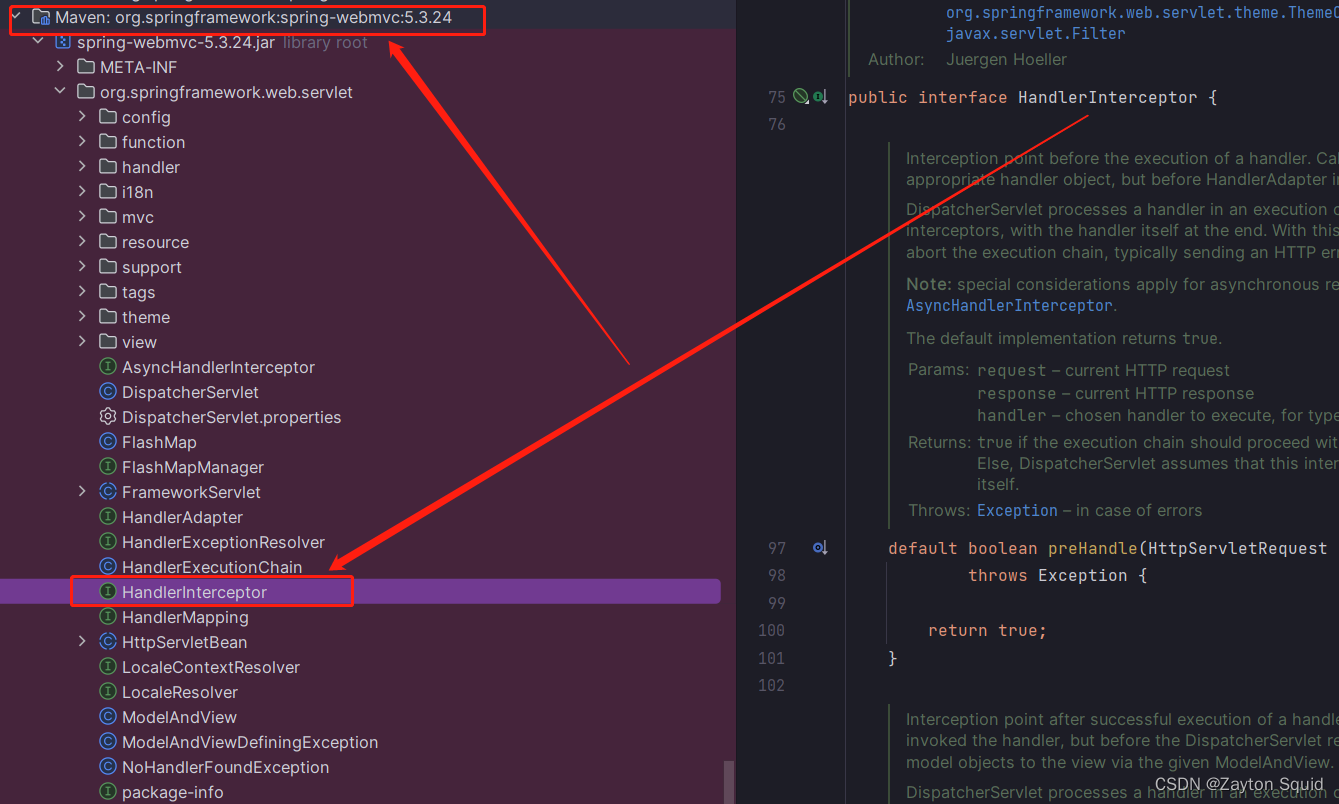
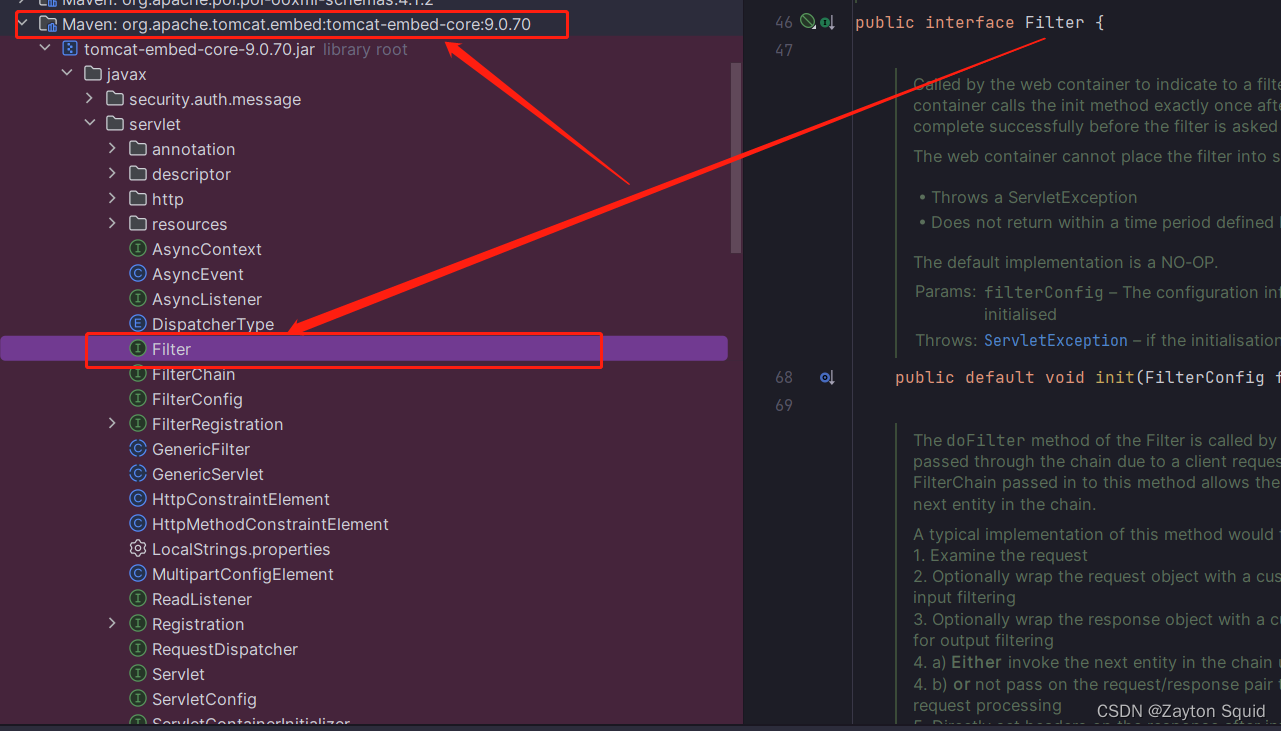 而
而拦截器是一个Spring组件,由Spring容器,这就说明它可以单独使用,不仅能应用与web程序,还可以用于application或swing等程序。
执行顺序不同
上文请求后可以看到控制台输出下面这一段结果
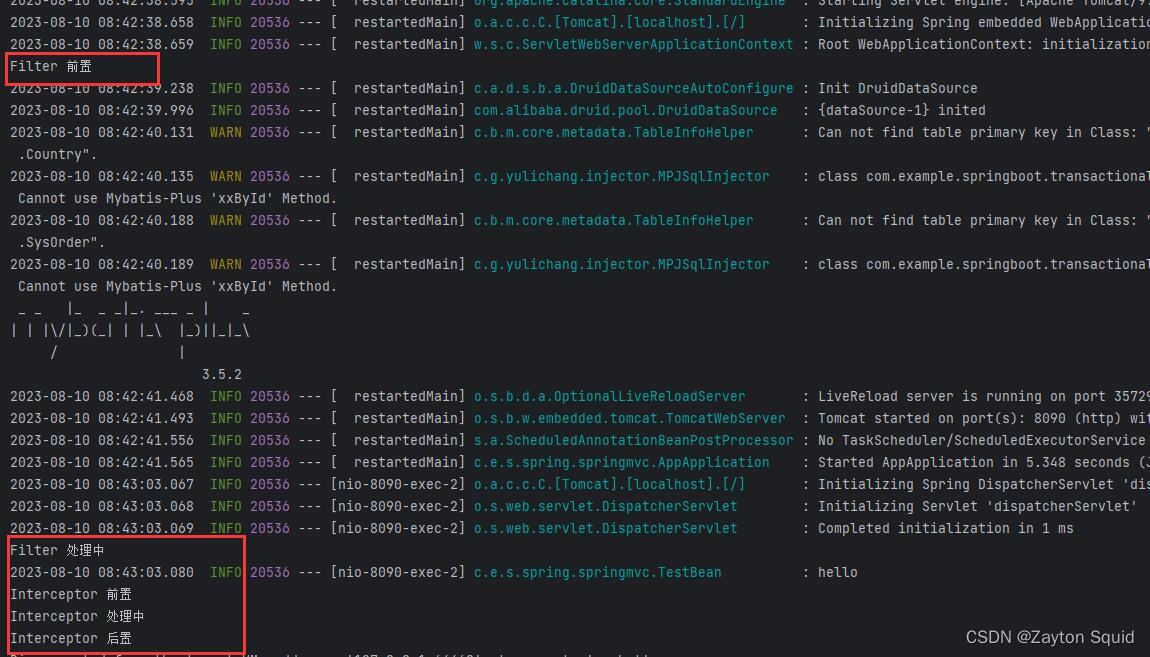
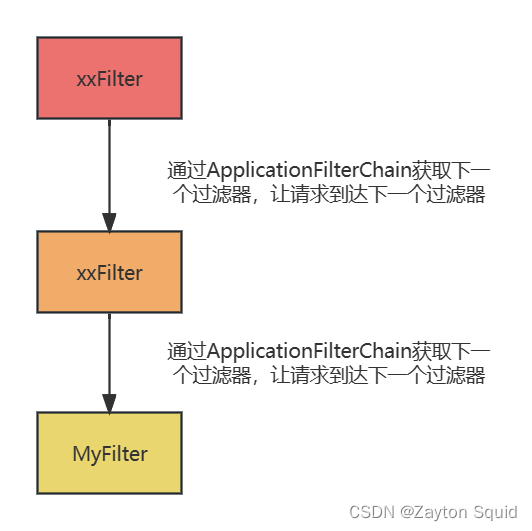
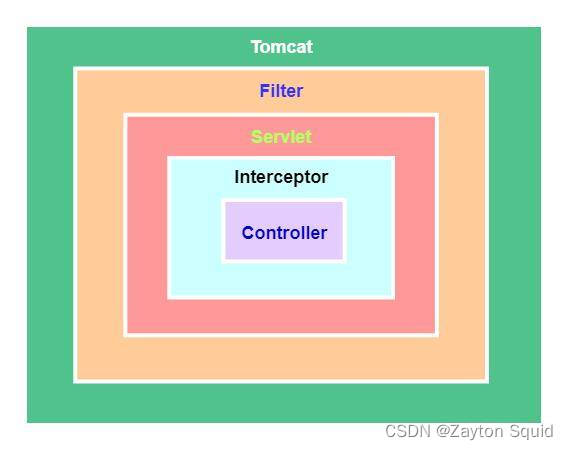
可以看出web请求是先经过过滤器,然后再到达拦截器的,它们的执行顺序如下图所示:
注入Bean情况不同
下面我们分别在过滤器和拦截器中注入bean,看看有什么区别。
@Component
public class TestBean {
     private static Logger logger = LoggerFactory.getLogger(TestBean.class);

     public void hello(){
         logger.info("hello");
     }

}
在过滤器中注入bean
@Component
public class MyFilter implements Filter {
    @Autowired
    private TestBean testBean;

    @Override
    public void doFilter(ServletRequest servletRequest, ServletResponse servletResponse, FilterChain filterChain) throws IOException, ServletException {
        System.out.println("Filter 处理中");
        testBean.hello();
        filterChain.doFilter(servletRequest, servletResponse);
    }
......
}
然后再拦截器中也注入bean
@Component
public class MyInterceptor implements HandlerInterceptor {

    @Autowired
    private TestBean testBean;

@Override
    public boolean preHandle(HttpServletRequest request, HttpServletResponse response, Object handler) throws Exception {
        System.out.println("Interceptor 前置");
        return true;
    }

    @Override
    public void postHandle(HttpServletRequest request, HttpServletResponse response, Object handler, ModelAndView modelAndView) throws Exception {
     	 testBean.hello();
        System.out.println("Interceptor 处理中");
    }

    @Override
    public void afterCompletion(HttpServletRequest request, HttpServletResponse response, Object handler, Exception ex) throws Exception {
        System.out.println("Interceptor 后置");
    }
}
然后启动项目,发送请求,发现居然报了空指针,原因是拦截器是在spring context之前加载的,所以在它创建时,我们自定的bean还没有生成。
 那么解决方案也很简单,就是在注册拦截器之前,先将
Interceptor 手动注入。
@Configuration
public class MyMvcConfig implements WebMvcConfigurer {
    @Bean
    public MyInterceptor getMyInterceptor(){
        return new MyInterceptor();
    }

    @Override
    public void addInterceptors(InterceptorRegistry registry) {
        registry.addInterceptor(getMyInterceptor()).addPathPatterns("/**");

    }
}
调整顺序的方式不同
过滤器直接在类上用@Order控制执行顺序,值越小优先级越高,而拦截器则是在addInterceptors方法中使用order方法调整顺序。
 @Override
    public void addInterceptors(InterceptorRegistry registry) {
        registry.addInterceptor(getMyInterceptor()).addPathPatterns("/**").order(1);
    }
有一点需要注意,当有多个拦截器时,先声明的拦截器preHandle()方法先执行,而postHandle()方法反而会后执行。这一点我们从源码中可以看出来,在DispatcherServlet的doDispatch方法中,在执行applyPreHandle的地方,我们看执行逻辑可以看出它的for循环是正序的,也就是说拦截器的applyPreHandle方法是顺序执行的,而applyPostHandle的for循环是反向的,这就明白为什么postHandle()、preHandle() 执行顺序是相反的了。
protected void doDispatch(HttpServletRequest request, HttpServletResponse response) throws Exception {

        try {
         //忽略.....
            try {

                // 获取可以执行当前Handler的适配器
                HandlerAdapter ha = getHandlerAdapter(mappedHandler.getHandler());

                // Process last-modified header, if supported by the handler.
                String method = request.getMethod();
                boolean isGet = "GET".equals(method);
                if (isGet || "HEAD".equals(method)) {
                    long lastModified = ha.getLastModified(request, mappedHandler.getHandler());
                    if (logger.isDebugEnabled()) {
                        logger.debug("Last-Modified value for [" + getRequestUri(request) + "] is: " + lastModified);
                    }
                    if (new ServletWebRequest(request, response).checkNotModified(lastModified) && isGet) {
                        return;
                    }
                }
                // 注意: 执行Interceptor中PreHandle()方法,是正向for循环依次执行
                if (!mappedHandler.applyPreHandle(processedRequest, response)) {
                    return;
                }

                // 注意:执行Handle【包括我们的业务逻辑,当抛出异常时会被Try、catch到】
                mv = ha.handle(processedRequest, response, mappedHandler.getHandler());

                if (asyncManager.isConcurrentHandlingStarted()) {
                    return;
                }
                applyDefaultViewName(processedRequest, mv);

                // 注意:执行Interceptor中PostHandle方法是反向for循环依次执行【抛出异常时无法执行】
                mappedHandler.applyPostHandle(processedRequest, response, mv);
            }
        }
        //忽略.....
    }
参考文献
https://www.pdai.tech/md/spring/spring-x-framework-springmvc-source-1.html
https://www.pdai.tech/md/spring/spring-x-framework-springmvc-source-2.html